Monday, December 7, 2015

DIY Homemade ARM Board Running Linux with LCD: Part 4 U-boot Bootloader Porting and Cross Compile


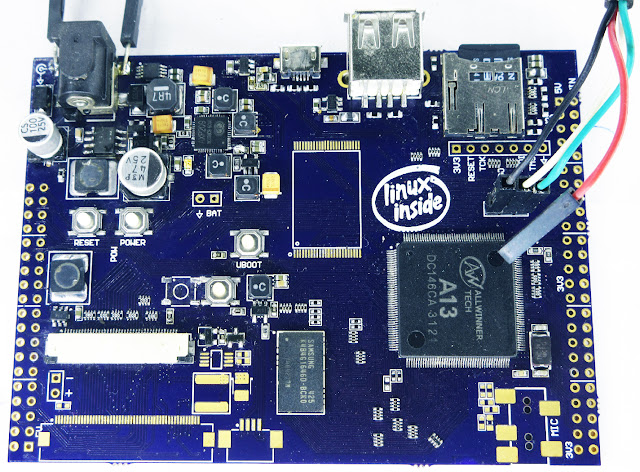
    This post is going to be 4th part in series of making a Linux capable ARM Board at home. click First, Second and Third to go to previous Parts,so lets start.

what is a Bootloader, Why do we need it? 

a boot loader is a program which is the first one to be executed by the CPU. it severs some very specific purpose "configuring few very essential things before loading the main program (may be OS) into main memory" , that is why it is called boot loader. depending on needs boot loader may do some other task(we will cover them here).
there are various shape and sizes of the bootloaders , they all serve almost same purpose.

with microcontrollers , some times it does not actually load the main program into memory but pass on the executing pointer to main program so that main program can run directly form the memory where it is.
Board With 4.3 inch LCD running Qt5 application to display JPEG Image and Time

Thursday, November 19, 2015

DIY Homemade ARM Board Running Linux with LCD ,Part 3: PCB Assembly and First Boot

 this is third part in the series of making a linux capable ARM processor board at home, last part we have designed schematic and PCB , in this part we are going to assemble PCB and  see if it boot for first time. here is Second Parthere is First part and Part 4 U-boot Bootloader Porting and Cross Compile.

there are very few challenging part which may create  a little issue in soldering. but all the part are hand solder-able with  a little or no extra tool. i have a hakko fx-888 soldering iron with standard tip , kester  flux  , paste and thin kester solder wire.i also have  a cheap Chinese hot air and an descent quality toaster oven. although hot air is all we need.

i have ordered PCB from osh park , they came very fast and good quality. as usual i have received 3 boards ,  i have also ordered stencil from osh stencil. stencil is not actually needed , it only help to solder all the component faster . if you don't want stencil you can always do without it , new BGA always comes pre balled so no stencil needed ,Processor has leads so no problem at all.  
the component which need a little care while soldering are


Friday, November 6, 2015

DIY Homemade ARM Board Running Linux with LCD ,Part 2 : Schematic and PCB Design

            this is second part in the series of making a ARM linux Board at home, in last part we have decided what we need and why. now we are going to build schematic for our board. as we are using Allwinner A13 CPU , we need it's datasheet and other reference manuals.although there is only a limited amount of data available direct from manufacturer,but there is pleanty of data there from other source , sunxi website is good place to start. all the reference docs i have used are available in my github

I have found this datasheet for our CPU.As A13 is quite common processor in cheap Chinese tablets, and olimex also has few boards with same CPU. there is tons of reference material available online.

Thursday, November 5, 2015

DIY Homemade ARM Board Running Linux with LCD ,Part1:Requirement Definition

         After quite lot of  research through various online document and article and working with many different things, i have finally managed to get my first Linux capable ARM Cortex-A8 board up and running. making the board i hae faced many  different kind of difficulties with different section. the board is Based to a ARM Cortex-A8 CPU running at 1Ghz which is really quite lot for homemade hand assembled stuff. i will take you with me on a journey how you can approach to come up with your custom linux board.

it is going to be some what descriptive tutorial with almost every aspect covered. so i have divided the whole things into parts. next part follows the previous.

how to decide what embedded Processor you Need?
 
Requirement Definition, first of all you need to determine what are your requirement and is this possible to fulfil them with  some high speed microcontroller with on chip RAM etc. or we need some high speed processor ?  As going for very high speed processor may often lead to have a large amount of extra hardware like you may need many power rails , external RAM,external Flash/ROM etc. which ultimately goes with expensive development and expensive final product. 

Monday, October 12, 2015

Basic Frequency Meter with FPGA , Verilog HDL , WireFrame FPGA

   In the series of learning FPGA project , here is simple little project to measure frequency with counter and few 7 segment display.

Measuring Maxim DS32Khz output absolute bang on

Sunday, October 11, 2015

WireFrame FPGA Board : NEC IR Receiver module With VerilogHDL


 this experiment "NEC IR receiver with VerilogHDL" utilize my WireFrame FPGA board which was published earlier Click here to go previous article.

NEC Protocol

 NEC Protocol has been already well documented and explained in the previous post click here to got to previous post


WireFrame FPGA Board, Validating counter modules with ModelSim Tutorial

this article is second part of creating  your first design with FPGA and verilogHDL, in particular WireFrame FGPA Board Xilinx XC3S250E board. we are going to use modelSim software From altera which is limited free software available to download from Altera website 


ModelSim Simulation Software From Altera


Thursday, October 8, 2015

First Project with WireFrame FPGA Board LED Blinking Test : Binary Counter with VerilogHDL , Xilinx ISE Tutorial


Few day back , I published about atiny little WireFrame FPGA Board, now it is the time to test the weather it is working , and FPGA is getting programmed .this article is goint be very very  basic , like how to create xilinx ISE project and  write a little binary counter in verilogHDL , how to wireup the module's port to I/O line of the FPGA . and finally implement the module , we will also simmulate the design with the help of verilog Test bench in model sim software.
after getting happy simulation result we will generate programming file(.bit file) and flashing the bit file directly into FPGA with help of a low cost JTAG cable.


Monday, October 5, 2015

WireFrame FPGA Board , Breadboardable Xilinx XC3S250E Board

  I have built a little FPGA board Xilinx xc3s250e called WireFrame. the board is only 50mm x 25 mm in size and it is possible to breadboard it. board also has 32MByte SDRAM, 4MByte serial Flash for storage. total 3  2A max  each Switching regulator for Vcc I/O 3.3V (adjustable with regulator feed back resistors), VCCAUX 2.5 V and VCCINT  1.2v.

  the first version of the board also had some switching boost circuit to generate various rails for E-ink displays. we don't need this feature for our current project. actually a little while back , I was working on project which interface a 6'' E-ink display to a ARM CPU Running Linux. the over all Requirement was in such shape it was not possible directly interface the display to the Linux machine because of the way raw e-ink screen works.E-ink screen does not have any intelligent controller built-in it has only a few Row and column driver which make the whole thing work. so I worked a little FPGA solution to work as controller instead going for standard controller IC because of few reasons.

The FPGA Board


Saturday, October 3, 2015

Cross Platform USB I/O Board With PWM in Qt5 , I/O Board V2

Quite a some time ago i published a USB I/O board PIC18F4550 which has total 16 I/O line and 5 analog input. The interface was written with Microsoft .net framework. Of course of being in .net we were bound to with windows only. so after many requests now here it is the next version of the good old USB I/O board.

The new version has complete change in the hardware. the are few feature addition like now it is possible to set the direction of individual I/O line instead in ground 8 I/O line each. the new Hardware has capability to generate PWM output with frequency range of 3Khz to 200 Khz with duty cycle from 0% to near 100 %. 

   The this version of hardware is based on PIC18F14K50 which is a 20 pin device. With this small microcontroller we now have Total 8 I/O lines , 3 Analog input , 1 PWM output. now the update rate of the interface is way much faster and and analog reading will automatically updated with the whole display.

  The USB interface is  still Standard Raw USB HID , you can sniffer the data with any host application of you choice or any programming library which support Raw HID. with help of some library you can interface the I/O Board with all sorts of automated testing and scientific calculation software like Matlab  or eve LABVIEW. almost all the these type application support raw USB HID.

The Hardware 


Thursday, April 23, 2015

Low Cost RF Control 4 channel Relay Board


here is quick project written with PIC12 micrcontroller from micro chip , in this demo , i describe how can you control devices use a RF remote and Receiver , Receiver and transmitter used low cost 433Mhz trasmitter and receiver . 


Friday, January 23, 2015

TLV320AIC23B Audio Codec Breakout Board

to get audio capability to my Raspberry pi / beaglebone / Aduio DSP(TMS320) projects i found my self making this little breakout board i hope you find useful.

PIC18F14K50 USB Breakout Board with RS232

 quite a some time ago i worked on this little pcb for PIC18F14K50 microcontroller , the good thing about this microcontroller is that it has  USB capability so i did this tiny pcb to utilize USB. the board made out of two kid of separate  sections as shown in the 3D rending blow, you can use this board a proper USB to RS232 converter or cut through the black line and it become simple USB I/O board.


Tuesday, January 6, 2015

12 Channel Relay + 2 Channel Dimmer control by IR Remote and keyboard

as extension to IR(infrared) Remote Control Relay Board with PIC 12F675 Microcontroller i have done this quite a useful project after too many requests. by using this hardware user have option to turn up to 12 relay on and off and two loads (like fan or motor) can be controlled with adjustable speed in case of motor , or adjustable intensity in case of a bulb.


this project is directly involved with high voltage AC which may cause sever damage. proceed with caution.
i will not be responsible for any risk involved,  you are on you own.


IR protocol 

IR protocol is same as previous projects . we use NEC protocol please refer to this link to know more about NEC protocol

Hardware


Friday, January 2, 2015

Measuring True RMS Mains Voltage and Frequency using MSP430 microcontroller

To practice DSP algorithm on MSP430 microcontroller, i am working on a project "Mains Monitor" which is basically a spectrum analyser which will monitor AC mains voltage using Fast Fourier Transform (FFT) and show spectrum frequency domain on a graphical LCD , the spectrum can be used to view if any harmonics present in the mains voltage which will ultimately determines the quality of the supply.

measuring True RMS voltage and frequency is part of that project, alongside of spectrum the LCD screen will display True RMS Voltage and frequency of AC mains line. most of the normal AC mains voltage meter measure average/peak voltage and then adjust the voltage a little considering sine wave input waveform. average measurement technique works well till input is pure sine wave but as soon as you input other waveform  like square wave from backup UPS, normal meter will not read them correctly. so if you want real effective voltage level you have to calculate true RMS voltage. but calculating true RMS is not very easy it need a decent amount of calculation to be performed. small microcontroller are not generally meant for these calculation but MSP430 is mixed signal microcontroller , it has few very advanced peripherals to support some light weight DSP operations. we will see in a minute how to calculate True RMS of a signal and what are the challenges doing this on a small microcontroller.